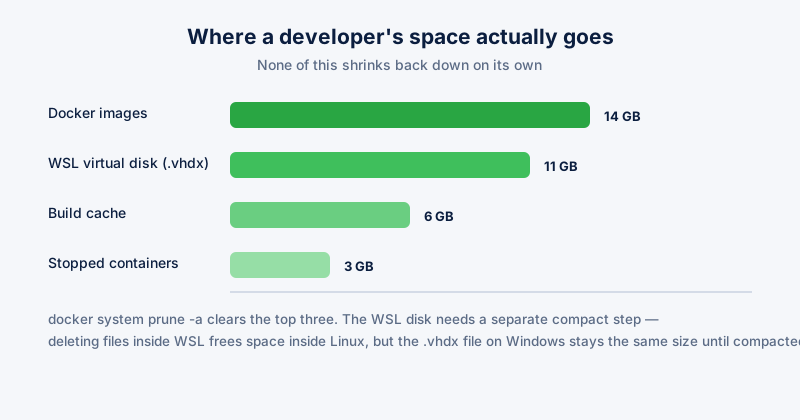
Docker and WSL are both extremely convenient about creating things and considerably less proactive about cleaning them up. Left alone for a few months of normal development work, it's routine to find tens of gigabytes committed to old images, stopped containers, and a WSL virtual disk that never shrank back down after files inside it were deleted.
Where Docker's space actually goes
- Images — every version you've ever pulled or built stays on disk until explicitly removed, including old tags of images you've since rebuilt
- Stopped containers — a container that exited doesn't disappear; it sits there holding its filesystem layer until removed
- Build cache — layers cached during docker build accumulate across projects and rarely get touched again
- Dangling volumes — data volumes left behind after their containers are gone
The single command that clears most of this at once: docker system prune -a. The -a flag additionally removes all unused images, not just dangling ones — run it without -a first if you want a smaller, more conservative cleanup, since -a will also remove images you might want to reuse later without re-downloading.
Why WSL's virtual disk doesn't shrink on its own
WSL 2 stores each Linux distribution inside a virtual hard disk file (a .vhdx file) that grows as you add files but does not automatically shrink when you delete them — the same behavior as most virtual disk formats. Uninstalling a large package inside WSL frees space inside the Linux filesystem, but the .vhdx file on your actual Windows drive stays the same size until it's manually compacted.
- Shut down WSL completely: wsl --shutdown (from PowerShell or Command Prompt)
- Open PowerShell as Administrator and run: diskpart
- Inside diskpart: select vdisk file="C:\path\to\ext4.vhdx" (find the exact path via wsl --list --verbose or your distro's AppData folder)
- Then: compact vdisk
The exact .vhdx path varies by distribution and Windows version — it's typically under %LOCALAPPDATA%\Packages\ in a folder named for your installed Linux distro. If you're unsure, search for files with the .vhdx extension under that folder before running diskpart.
Making it a habit rather than a rescue mission
Both of these accumulate slowly enough that they're easy to forget about until a drive gets uncomfortably full. Running a Docker prune and checking WSL disk size every month or two, rather than only when space runs out, keeps either from becoming a surprise tens-of-gigabytes problem.
ETA System Doctor's WSL & Docker Disks tool runs both the Docker prune and the WSL virtual disk compaction from one place, without needing to remember the diskpart sequence or track down the .vhdx path by hand each time.